General settings
The first section of your school that you should visit after registering on the Sofbook platform and filling out your profile is the “General Settings” section. In this section, you can set the basic parameters for the school’s operation. The section consists of four blocks:
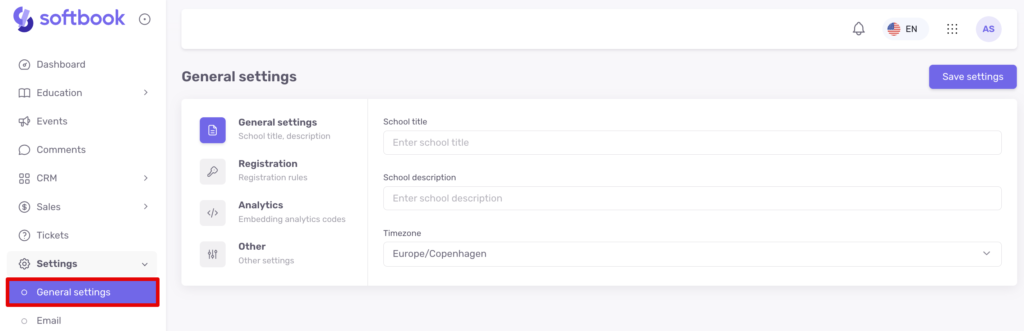
General LMS settings
This block contains the basic settings of the platform: school name, school description – what students see, as well as you and your team on the school login page and the registration page.
There is also a time zone here. The default setting is Kyiv time. All events, accesses, schedules, and settings are tied to the set time zone.
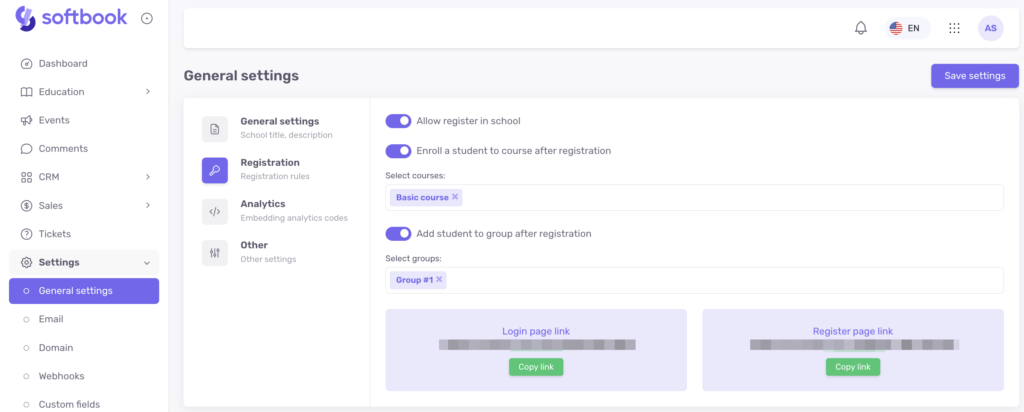
Registration block
Contains two rules for customization that can be activated:
1. Allow registration. Each school has its registration link. It can be copied and given to the student. If the student does not have a Sofbook account, the platform will prompt the student to enter first name, and last name and come up with a password. If there is a Sofbook account, he will have to enter his email and password from it to register with your school. Such users will get into your school as regular students but without groups and access to courses.
2. Enroll student in course after enrollment – an item that gives students access to your free courses and enrolls them in them automatically. Perfect for tripwires, lead magnets, or other types of products that generate customers.
If your settings allow enrollment, and you want to expand your list of marketing tools to increase student traffic, activate this option. Also, select from the list below the courses or other products you want to provide access to. To collect these students into a separate group, activate the “Add students to the group after enrollment” option and select which group you want to enroll them into.
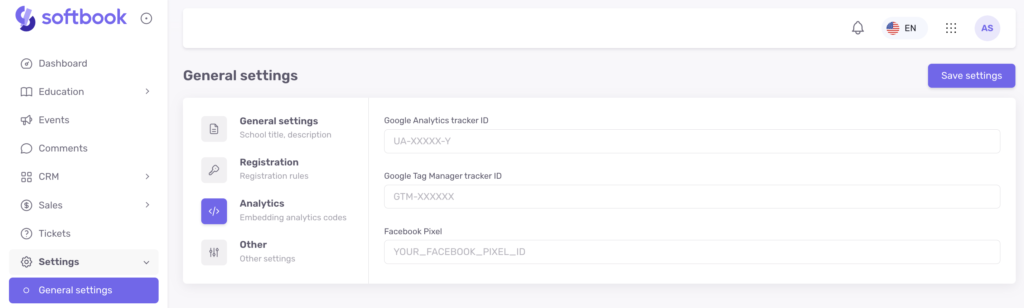
Analytics
This section allows you to integrate Google Analytics, Google Tag Manager, and Facebook Pixel into your school by simply entering the corresponding tracker ID in the required field and clicking the “Save” button. With these settings, you will be able to gain much more information about the school’s performance, products, and clients.
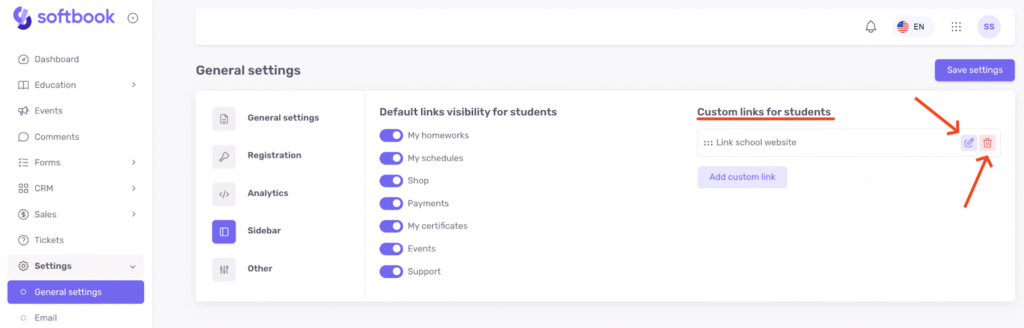
“Sidebar” block
In the sidebar settings, you can hide unnecessary default links and add your own, which can lead, for example, to external resources, additional materials, or other sections of the platform.
Hiding default sidebar links
In the school settings, you can choose which default links will be visible to students. This is done using the “Default links visibility for students” section.
To hide an item:
- Go to Settings → General settings → Sidebar.
- In the “Default links visibility for students” section, toggle off the switch next to the item you want to hide.
Note that these changes affect only the student interface — staff members will still see all links.
Adding a custom link
You can add a custom link to the sidebar, which will appear alongside the default links for students.
To add a custom link:
- In the same Sidebar section, under Custom links for students, click the Add custom link button.
- A sidebar panel will open with a form where you fill in the following fields:
- Link title — internal name (visible to staff only).
- Link text — the name of the link as students will see it. You can provide this in any of the 8 languages supported by the platform: Ukrainian, English, Russian, French, German, Polish, Portuguese, Spanish.
- Link URL — the web address the link points to.
- Click Add link to save.
Added items will appear in the Custom links for students list, where you can edit them by clicking the pencil icon or delete them by clicking the trash can icon.
“Social” block
In this section, you can manage social network functions and communication between users of the online school.
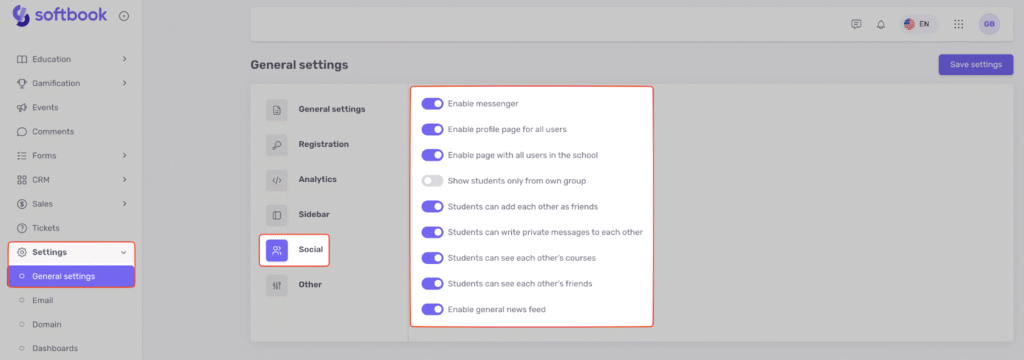
The “Enable Messenger” option activates the platform’s internal messenger for exchanging private messages.
The “Enable profile page for all users” option allows the creation of social profiles for all users on the platform.
If you enable “Enable page with all users in the school”, a section with a list of all school users will appear in the sidebar for students.
The “Show students only from own group” option limits visibility so that students can only see their groupmates.
The “Students can add each other as friends” feature allows students to send friend requests and build their own friends list.
The “Students can write private messages to each other” option enables students to exchange private messages in Messenger.
If you activate “Students can see each other’s courses”, a tab with a list of enrolled courses will appear on the student’s profile.
The “Students can see each other’s friends” option allows viewing other students’ friends within the school.The “Enable general news feed” option adds a feed displaying all user posts within the school.
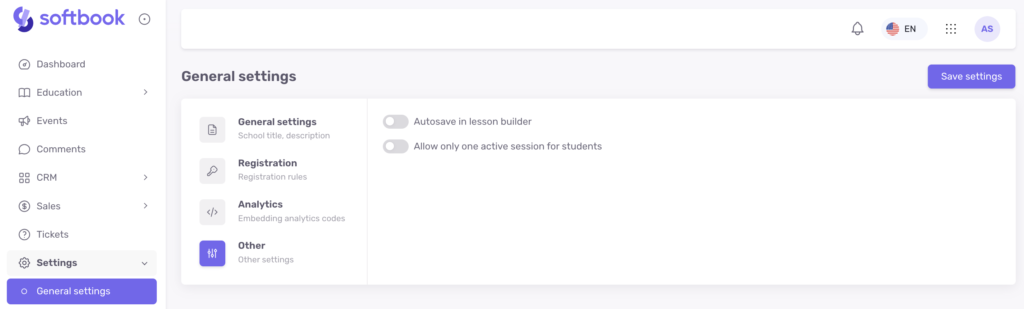
“Other” block
The block contains several features:
- Autosave in Lesson Builder. If this option is enabled, all your changes in the Lesson Builder will be automatically saved. That is, if you work on lesson filling, take a break for a few minutes, but don’t press the “Save” button in the designer, the platform will do it for you if it notices that the cursor is inactive for 20 seconds.
- Allow only one active session for students. This option gives you the ability to limit the transfer of account access data between different users. If a student logs into school from one account and then logs in with the same data from another device, only the last device will remain active. This is done to combat account transfer and course sharing on demand by some online schools.
When all the items of the individual block are customized, click “Save Settings” and move on until everything works the way you want it to.
Done! Now you know how to work with general LMS settings and what they affect.


