YouTube
A YouTube webinar is a live webinar format powered by a YouTube livestream. You launch the stream on YouTube, while Softbook LMS turns it into a complete webinar page with slides, chat, a CTA button, and access settings for students.
For viewers, it looks like a regular webinar inside the platform: the video, presentation, chat, and additional elements are all displayed directly on the webinar page.

Preparation Before Launch
Before creating a webinar, prepare the following:
- a YouTube channel where the livestream will run;
- a link to the YouTube livestream;
- a PDF presentation;
- the webinar start date and time.
You do not need to connect the YouTube channel separately. Simply paste the livestream link.
You can use any convenient streaming tool:
- OBS;
- Streamyard;
- YouTube Studio;
- the YouTube mobile app;
- other streaming services.
The main requirement is that the livestream is available via a YouTube link.
Creating a Webinar
To create a webinar, go to the Webinars section and click Create Webinar.
In the creation window, enter the webinar title and select the YouTube Webinar type.
After creation, the webinar settings page will open.
Step 1. General Information
In the first step, enter the webinar title and description. This information is displayed to students in the webinar list and on the webinar page.
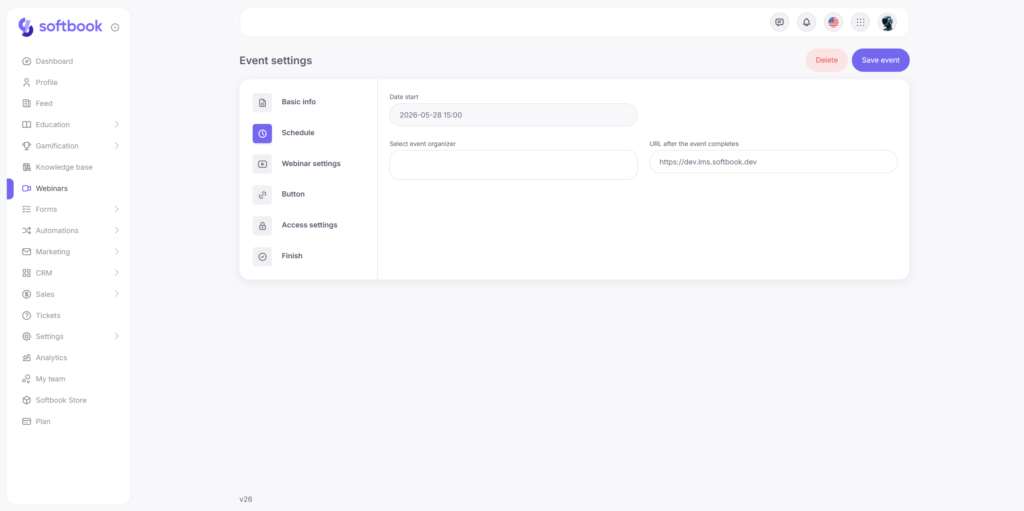
Step 2. Schedule
At this step, configure:
- the webinar start date and time;
- the estimated duration;
- webinar hosts.
Before the webinar starts, viewers will see a countdown timer on the webinar page.
School staff members can be assigned as hosts. During the webinar, hosts receive access to additional webinar controls.
Step 3. Webinar Settings
At this step, configure the main webinar parameters.
First, specify the video source — the YouTube livestream link.
Next, choose the webinar display mode. Two modes are available:
- Camera Only — only the presenter is displayed on the page;
- Camera + Slides — the presentation is displayed in the main area, while the presenter’s video appears in a separate window.
For the Camera + Slides mode, you can additionally choose the presenter video position:
- top left corner;
- top right corner;
- bottom left corner;
- bottom right corner.
If the Camera + Slides mode is selected, you can upload a presentation in PDF format.
After uploading, the platform automatically splits the PDF into individual slides, saves them in the system, and prepares synchronized slide switching during the webinar.
During the webinar, the host switches slides manually, and all viewers see the changes simultaneously.
If a new PDF file is uploaded, the previous presentation is automatically replaced.
A Delete Presentation button is also available.
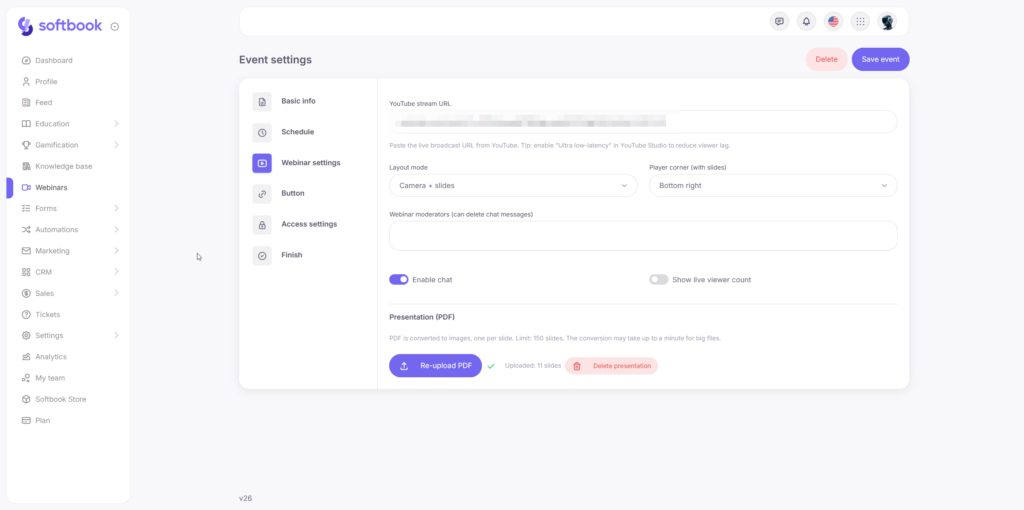
Please note that only PDF files are supported, and embedded videos or animations inside the PDF will not be played.
You can also configure additional webinar elements at this step: chat, viewer count display, and moderators.
The chat can be enabled or disabled. If enabled, viewers can communicate with each other and send messages during the webinar.
School staff members can be assigned as moderators. Moderators receive access to chat management during the webinar and can assist the host.
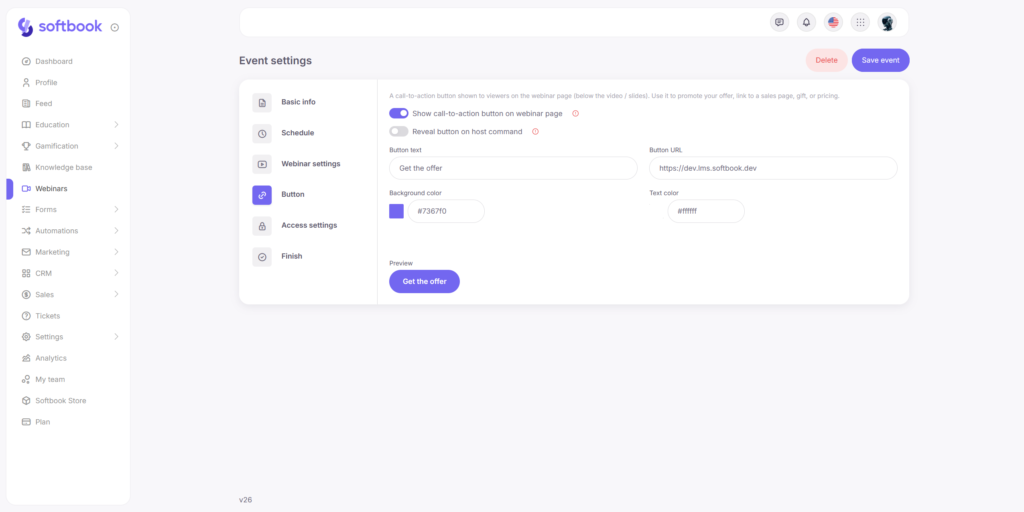
Step 4. Button
A CTA button can be displayed below the webinar.
For example:
- Enroll in the Course;
- Get a Discount;
- Download Materials;
- Open the Payment Page.
For the button, you can configure the text, link, background color, and text color.
You can also enable the Show Only by Host Command option. In this case, the button will not appear immediately after the webinar starts. The host will be able to display it manually at the desired moment during the webinar.
Step 5. Access Settings
At this step, configure who can view the webinar.
Available options:
- Public Access;
- Only Students of Specific Courses;
- Only Selected Groups.
If needed, multiple courses and groups can be selected at the same time.
Step 6. Finish Setup
At the final step, the system displays the webinar summary and the webinar page link.
This link can be shared with students to join the live webinar.
What Viewers See
After saving the webinar, the webinar page becomes available.
Before the webinar starts, viewers see:
- the webinar title;
- description;
- date and time;
- countdown timer.
After the webinar starts, the page displays:
- the live stream;
- the presentation;
- the chat;
- the CTA button;
- the viewer count.
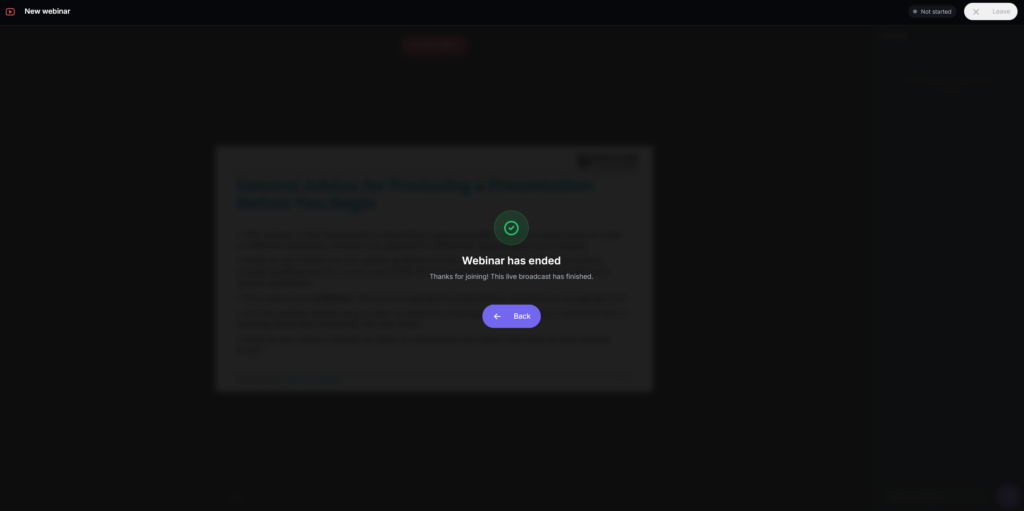
After the webinar ends, the page receives the Webinar Finished status.
Webinar Controls During the Live Stream
During the webinar, school owners, hosts, and moderators have access to additional controls:
- start the webinar;
- switch slides;
- show the CTA button;
- finish the webinar.
That’s it. Now you know how to create YouTube webinars, configure the livestream, manage access, and host live sessions for students directly inside Softbook LMS.


